Printfriendly

Make Your Own Holiday Tree with Starlights...

This Starlight Candy Tree is super easy, yet makes a big impact on the mantle, as a centerpiece or anywhere you can think of!  It's fun to do and simple enough that the kids can lend a hand.  I chose to keep the Starlights wrapped as I like the way the cellophane sparkles and catches the light.  It also helps fill in the gaps between the candies.  The tree stores easily in a plastic bag during off season.  Mine has been stored in a hot/cold attic for 2 years and still looks like new!  I hope you have fun with this project.
#starlightcandytree #christmascrafts #freechristmascrafts #diychristmastreecrafts

SUPPLIES:

(2-3) Bags of Starlight Candies
(1) Large Styrofoam cone or make one out of cardboard
Hot Glue Gun

DIRECTIONS:
  1. Keeping Starlights wrapped, place a small amount of glue on the back of each candy and press onto cone shape.
  2. Work from the top down, paying attention to spacing.  You may have to add or subtract space in between each candy to get them to fit correctly. 
  3. Turn the cellophane ends so they fill the areas where there will be gaps.
  4. Continue until the entire cone is covered.

Best Of Luck With Your Project!

copyright, 2013, Nicole F. Cox, thismomentisgood.blogspot.com, all rights reserved.

Yarn & Starlight Holiday Letters...


Spend an afternoon making these festive letters...They would look good on the mantle, a cupboard, above your kitchen cabinets or on the windowsill.  They are easy to make and only require a few supplies.  During the off season, store the letters in large Zip-loc bags.  This will keep them clean. Wrap the starlight letter in parchment paper, then place in a Zip-loc bag.  I have stored mine in the attic for 2 years this way and it has endured the cold/heat without a problem.  These letters will add fun to your holiday decorating or make a nice gift! #holidaycrafts #christmascrafts

SUPPLIES:

Letters (any size, shown are large)
Starlight candies (mints)
Hot glue gun
Yarn-Red & Green
(see below)


DIRECTIONS:

  1. Wrap Letters in yarn, see picture for colors.  Add glue every 1/2" to hold yarn on letter.
  2. Glue Starlights to the letter O. Unwrap them as you go.
  3. Spray the letter O (with the starlights) with a matte craft finishing spray. Use (2) coats. Re-spray each year when you bring it out for the season.
  4. If you wish to hang them...add heavy duty Velcro to back.  I just lean them against the wall, they stand up on their own.
  5. That's it...Your done!
Thank You For Reading!

copyright, 2013, Nicole F. Cox, thismomentisgood.blogspot.com, all rights reserved.
#holidaycrafts #christmascrafts #noelsign #noellettering

The recipe pictured above has been halved, as it was just my husband and I eating that night.  The recipe below will make double this amount! #cabbagerecipes


This is one of those recipes that I've been making for 26 years.  It was given to me by my sister and was originally my mothers recipe.  It is the best cabbage dish that I have ever made.  Adults and kids seem to like it equally.  My girls called it "pizza cabbage" when they were little.  The cabbage seems to get extra tender and sweet in this recipe.  It is very easy to make but is suitable for company!  I have modified the recipe a little over the years from the original.

Cabbage a la Malon


Bake Covered 350 degrees; 45 minutes and 5 minutes; 4-6 servings

Ingredients:

1 lb. ground beef
1 cup chopped onion
1 cup chopped celery
3/4 head cabbage cut into 6 wedges
29 ounces tomato sauce
2 tsp garlic salt
1/2 tsp onion powder
1 1/2 tsp Italian seasonings
1/2 tsp pepper
1 cup grated mozzarella cheese


Directions:

Preheat oven to 350 degrees.

In large, oven safe pot, brown meat, onions, and celery.  Arrange cabbage on top of meat.  Blend tomato sauce and seasonings.  Pour over cabbage.

COVER and bake at 350 for 45 minutes.

Sprinkle with cheese and bake at 350 degrees for 5 more minutes.

Serve over rice!

#cabbagerecipes #recipes #easycabbagerecipes


THANK YOU FOR READING!

copyright, 2013, Nicole F. Cox, thismomentisgood.blogspot.com, all rights reserved.

 A List Of Loom Knitting Techniques & Stitches...


Below is a guide of the most useful #loom knitting stitches and techniques used in loom knitting.  I hope to keep adding to this guide and welcome readers to comment on stitches and techniques they would like to see appear here.  In the future, I will try to update this post with pictures.  That way you'll be able to see what the individual stitches and techniques look like.
#loomknittingstitches #loomknittingguide #freeloomknittingguide #freeloomknittingpatterns

KNIT STITCH - Loosely lay the working yarn on the outside of the loom, above the loops that are already on the pegs.  using your knitting tool, lift the bottom loop over the working yarn and over the peg forming a new stitch.

E-WRAP KNIT STITCH: (Abbreviation EWK) - Same as knit stitch, except instead of lying the working yarn flat above bottom loops, you would wrap each peg first then knit.

DOUBLE E-WRAP KNIT STITCH:  Creates a loose stitch for a lacy shawl or other project.  Wrap the peg you wish to double knit, lift the bottom loop over the top loop and off the peg, repeat (double e-wrap stitch made).

PURL STITCH: Lay the working yarn on the outside of the loom below the loops already on the pegs. Insert your knitting tool down through  the loop on the peg, grab working yarn, pull yarn up through loop forming a new loop.  With your fingers, pull original loop off the peg and place new loop back on.

STOCKINETTE STITCH:  (Will Curl) - Knit all rows/rounds until desired length.

TWISTED STOCKINETTE STITCH:  E-wrap knit all rows/rounds until desired length. Results in a loose weave full of texture.

CROSSED STOCKINETTE STITCH:  Alternate a row of e-wrap knit stitches with a row of knit stitches. This will result in a medium weave textured fabric.

REVERSE STOCKINETTE STITCH: (will curl) - Purl all rows/rounds until desired length.

RIB STITCH OR RIBBING:  (will not curl)-good choice for cuffs and hems.
  1. Single Ribbing: Involves (2) stitches. row/round 1: K1, P1, K1, P1, repeat. Do this every row until you reach desired length.
  2. Double Ribbing: Involves (4) stitches. Row/Round 1: (K2, P2, K2, P2, repeat). Do this every row until you reach desired length.
MOSS STITCH or SEED STITCH:  Row/Round 1 (K1, P1, K1, P1, repeat) Row/Round 2: (P1, K1, P1, K1, repeat), Repeat, alternating each row/round.

GARTER STITCH: (Doesn't curl, reversible)  Row/round 1: Knit, Row/round 2: Purl, repeat, alternating each row/round.


VIDEO LINKS:

Criss Cross Stitch:  Video from the knitting Board. Click Here: Criss Cross Stitch Tutorial.

Single Knit effect:  Video from the knitting Board.  Click Here:  Single Knit Effect Tutorial

Basket Weave:  On the round knifty knitter.  Click Here:  Basket Weave Tutorial

Figure 8 Stitch: On the round loom.  Click Here:  Figure 8 Tutorial

OTHER KNITTING TECHNIQUES...


HONEYCOMB PATTERN USING BOX STITCH:  Directions for honeycomb scarf.


BOBBLES:  This bobble is a one stitch bobble that gets knitted five times to form a small bobble. Reach the peg/stitch where you want your bobble to be. Knit on that peg 5 times. Take the last loop off the peg and hold it on your knitting tool. Reach down and bring back to the peg the very first stitch that was on the peg. Place the loop being held on the tool back on the peg. Peg has now 2 loops. Knit.

RESOURCES:

+Pam Loomer:  youtube channel.  Excellent videos and patterns.  Also has an amazing looming community called +loomaholics. Click Here: Pam Loomer


 Hope you find this guide helpful!


2013, Nicole F. Cox, thismomentisgood.blogspot.com, all rights reserved.

#loomknittingstitches #freeloomknittingguide #howtoloomknit

What to expect on your first Color Run...


A Color Run is all about getting a little crazy and having fun!
I've survived my third event since September, part of my get fit, give back campaign.  It was a Color Vibe 5K run.  As many may already know from reading my blog, I'm on a mission to accomplish six charity/fitness events in a one year period.  This was my first color run. The charity associated to our event was The Hug-A-Bear Foundation.  I was a little nervous all week about it because I had a really bad cold and didn't know if I could run.  I also started to stress about the mess that would inevitably be in my car.  I quickly found out that with a little preparation, a color run is not about stress, it's all about fun!  I hope this guide will help anyone planning their first color run event.

Why do a Color Run?
  1. It's a great way to get active in your community.
  2. It's a low pressure way to do your first 5K!  Or like me, do back to back 5K's!  It is not timed and nobody will notice how fast you are or aren't.
  3. Remember finger painting as a kid? It's like that! You can get in touch with your inner child.
  4. These events usually benefit a local Charity.  Always a good thing.
  5. It's a great way to bring your family and friends together.
  6. It's an event that gets you moving and we all know that's good for the mind, body & spirit.
Who Can do a Color Run?
  1. Everyone! Babies, Kids, Moms, Dads, Grandparents, handicapped, etc. From my experience, 50 percent of all entrants walk!  I even saw a man with two leg braces on.  I don't know who he was but he's my new Hero! Next time I think I have an excuse not to exercise, I'll think of that man.
How should you prepare for a color run?
  1. Cover your car seats the night before. It will give you less to do at 7 a.m.
  2. The day before you can register and pick up your color run packet.  It contains a white t-shirt, a color packet and a pair of plastic sunglasses. You can also register the morning of the run.  That's what we did.
  3. Enlist a family member or friend (who is not doing the run) to come and take pictures for you...the pictures are the best part!
  4. The night before, put plastic bags, old towels, baby wipes and a change of clothes in your car.
  5. The morning of, wear old clothes! Costumes are also fine and encouraged, anything goes!
  6. The color will go through your clothes.  Don't wear good undergarments.
  7. If you have color treated hair, put a light coating of coconut oil through your hair.  This will keep the dye from staining your hair.  Also wear a bandanna or hat!
  8. If you have breathing issues, bring a dust mask for going through the color stations and for the color dance at the end.  The color is non-toxic but it does make your breathing a little heavy.  A bandanna pulled up over your face will also help.
What to expect when you get there...
  1. Expect some traffic.  There is a lot of people at this event!  Be patient, it is well run and goes pretty smoothly.
  2. We paid $5 per car for parking.
  3. The lot was big so there was a bit of a walk to the registration area.  It was November 23rd and cold/windy so the walk helped us warm up.
  4. Registration was easy!  I have to hand it to the coordinators of this event, we were late and the staff was friendly and quick.
  5. Get a "before" picture!
  6. Line up at the starting area.  They release several hundred people at a time, in waves.  They will keep you entertained with music while you wait.
During the run...
  1. When it is your groups turn, you will run through a cloud of color...your color run has begun!
  2. Most people jogged through the color and then started walking.
  3. Our team, "Life in Color" jogged most of the way.  Only slowing to allow slower members of the team to catch up.
  4. There were probably about 4-5 color stations along the run/walk.  The staff were fun & friendly when you went through.  Basically a color station is compromised of about 5 staff members who throw color at you...Fun!
  5. Don't worry if most of the color blows off you while you are running, there is plenty of color to come at the end of the 5K.
  6. Use the colors stations as a place to allow slower members of your group to catch up to you and then go through together.  It's more fun that way and it takes the pressure off of the non-athletic people in your group.
  7. Eventually, since we were the last group to go (we were late!), the color does run out.  No problem, its everywhere, pick it up off the ground and throw it or roll in it.
  8. Cross the finish line!
After the Color Run...
  1. There's music and a dance mosh pit area. Don't worry, no pushing and shoving went on.
  2. This is where the real color explosion happens.
  3. They'll tell you when to open your color packets (given to you at the beginning of the run) and simultaneously start spraying you with the color;  All while the music is blaring and everyone is cheering.
  4. You can stay as long as you want.  We were the last group of runners and we left before the festivities were ending.
After the Color Run...
  1. When you get to the car, shake your clothes out.  Most of the color will just dust off.
  2. Use a towel to dust off each other.
  3. Use baby wipes to wash your hands and face.
  4. I had a second layer of clothes under my outerwear, so I peeled the top layer of clothes off. It was cold out.  The color will go through right to your bra and underwear but it will be less!
  5. Now is a great time to go to breakfast and talk about all the fun you had!
  6. At home, Use a combination of clarifying shampoo (1 Tbs) & Baking soda (1 Tbs).  This will take all the color out of your hair, if you used the coconut oil.  My hair is color treated and blond and I had no problem with the dye.
  7. Wash all your clothing & towels in cold water (alone). Do this a couple of times!
  8. I ran an empty bleach cycle through my washer after, just to make sure no dye was left in the machine. I am not sure this was necessary but "better safe then sorry".
That's it, you've done your first Color Vibe, Color Run!  What they say is true, it really is the most fun you can have running/walking/jogging a 5K.  The small amount of prep and clean up was worth it.  At 46 years old, I was the biggest kid out there and got a lot of exercise while I was at it!  Plus, helped out a great cause...double bonus!

Here is a useful link...http://www.thecolorvibe.com/


Last color station, everyone just rolled in the color or threw it off the ground!
This is the dance, color explosion at the end. Color packet shown.

Thanks to my husband for the great photography!


Thank you for reading...Now get out there and Color Run!


#colorrun #fitness #colorvibecolorrun #preparingforacolorrun
 #charityevents #charityrun #colorrunreview #colorvibecolorrunreview

Copyright, 2013, Nicole F. Cox, thismomentisgood.blogspot.com, all rights reserved


Victorian Inspired Fingerless gloves...


#Loomknitwristwarmer #loomknitfingerlessmitten #freeloomknittingpatterns #loomknitting #knitting #victorianwristwarmer #victorianfingerlessglove #victorianfingerlessmitten #loomknitwristlet

Spend a day knitting these ultra feminine, yet cozy wrist warmers for yourself or a friend!

Supplies:

Blue Knifty Knitter
Knitting Tool
Crochet Tool
Cream Colored Yarn
(2) Buttons
Lace Trim

Pattern: (Please read disclaimer at the bottom of this post before knitting any of the patterns on this site)


Chain Cast on with 2 strands of Cream Yarn (used as one)

Rows 1-3:  Rib Stitch (K1, P1, K1, P1, repeat around)

Row 4:  P1 (skip 1, WYIF, P1) around
Row 5:  knit around
Row 6:  P2 (skip 1, WYIF, P1) repeat around
Row 7:  knit around
Row 8:  P1 (skip 1, WYIF, P1) around

NOTE:  Rows 9-14, at peg 24, reverse direction and knit back to peg one.  This will form your thumb hole.
Lengthen this process if you want a larger thumb opening.

Row 9:  knit around
Row 10:  reverse directions, P2 (skip 1, WYIF, P1) around
Row 11:  reverse directions, knit around
Row 12:  reverse directions, P1 (skip 1, WYIF, P1)
Row 13:  reverse directions, knit around
Row 14:  reverse directions, P2 (skip 1, WYIF, P1)

Stop reversing direction here (unless you want larger hole for thumb)

Rows 15-27 (Repeat rows 9 through 12) DO NOT reverse direction!

Rows 28-37:  e-wrap knit stitch

Row 38:  Purl
Row 39:  Knit
Row 40:  Purl
Row 41:  Knit
Row 42:  Purl
Row 43:  Knit

Chain one bind off

Weave in ends

-Using 1 strand of cream yarn and needle, loosely sew a gathering stitch at top of glove.  Place glove on and tighten around hand, leave loose enough that you can comfortably pull glove on and off. knot. weave in ends.

-Repeat just above where the e-wrap knit stitches start.

Sew on buttons

Sew on lace

KEY:

P=Purl
K=Knit
skip 1, WYIF = Skip a peg with your yarn in front.  You do this by removing yarn off peg, holding it with knitting tool, then place working yarn behind peg but in front of loop on knitting tool, place loop back on peg.

I will probable tack down the bottom of the lace!


Thanks For Reading!

Disclaimer:  I have made every effort to ensure that these instructions are accurate and complete.  I cannot, however, be reponsible for human error, typographical mistakes, or variations in individual work.  I am not a professional pattern writer.  Although these patterns have been tested by me, they are still considered test patterns because they have not been done by a large group of knitters.  They are being shared free for this reason.  Please knit these patterns at your own risk.


Copyright, 2013, Nicole F. Cox, thismomentisgood.blogspot.com, all rights reserved.


Please check back often for new FREE PATTERNS.  You can find all of my loom knitting patterns under the category Loom Knitting.  While your at it, check out our other posts!

If you are looking for more complex patterns please visit my new Etsy Store at ThisMomentisGood at Etsy for patterns available for purchase.

Thanks, Nicole

#freeloomknittingpatterns #loomknitting #loomknittingpattern #loomknitscarves #loomknithats #loomknitboottoppers


Disclaimer:  I have made every effort to ensure that these instructions are accurate and complete.  I cannot, however, be reponsible for human error, typographical mistakes, or variations in individual work. Although these
patterns have been tested by me, they are still considered test patterns because they have not been done by a large group of knitters. They are being shared free for this reason.  Please knit these patterns at your own risk.

Copyright, 2013, Nicole F. Cox, thismomentisgood.blogspot.com, all rights reserved.

Fun, Cat in The Hat, Loom Knit Hat Pattern!


After making my loom knit bows the other day, I started thinking about a project where I could incorporate them.  I remembered that the Cat in The Hat always wears a bow tie.  I think Dr. Seuss is a special memory for most kids so I thought it would be fun to loom knit a hat with that theme. Originally I planned on putting the bow under his chin in the front but then realized that although it would look cute in a picture, it probably wouldn't be fun to wear.  I decided to add it to the back of the hat.  I think it fits there perfectly.  I have to admit that my Cat in The Hat's face looks a little naughty so if you want a happier version just widen his mouth and bring up the sides of his mouth higher.  This hat is pretty stretchy so I think it would fit kids to adult.  I would just shorten it for a child unless it's going to be used as a costume.  We spend every Halloween with my young nephews so I'm thinking about wearing it next year as the start of my Halloween costume!

Supplies
  • Green Knifty Knitter Loom (or another size loom, measure head carefully)
  • Knitting Tool
  • Crochet Hook
  • Medium Pom Pom Maker (green)
Yarn
  • 1 Skein Lion Brand, Hometown USA #6, Color: New York White
  • 1 Skein Lion Brand, Hometown USA #6, Color: Tampa Spice
  • 1 Skein Lion Brand, Hometown USA #6, Color: Black
  • 1 Skein Charisma Baby, Color: Aqua

Pattern

-Chain cast on with 2 strands (used as one) Aqua
-e-wrap knit (1) row
-e-wrap cast on white
-e-wrap knit with white (10) rows
-change to red
-e-wrap knit (1) row
-Rib Stitch (12) rows (k1,p1,k1,p1, repeat)
-Fold up brim by placing 1st red row of stitches on loom (1 stitch/per peg, this will cause your knitting to bubble outward as seen in the photo).
-knit 
-change to white
-e-wrap knit 3 rows in white
-change to red
-e-wrap knit (3) rows in red
-change to white
-e-wrap knit (3) rows in white
-change to red
-e-wrap knit (3) rows
-Chain one bind off
-Turn hat inside out.
-flatten hat and sew a straight line along the top of the hat.
-Turn right side out.
-Sew on the face with black yarn using the photo as reference. (sorry, this wasn't charted)
-Split (1) strand of black yarn in half and sew on whiskers.
-make a bow and attach it to the back of the hat. Directions can be found here:  Loom knit bow directions
-Make (2) pom poms with medium pom pom maker.
attach pom poms to hat.


Loom Knit Harvest Beanie with slight slouch...


#loomknitbeanie #loomknitslouchhat #loomknitting #knithat #loomknithat #loomknitslouchyhat #freeloomknittingpatterns #loomknitting #loomknit #Freepatternloomknitbeanie


This Slouchy Beanie will keep your head warm and keep you looking fashionable for fall.  It is made on the green or purple round Knifty Knitter Loom (or any loom of your choosing) with Harvest colored yarn. It would look great in any color so feel free to knit it up however you like!  It takes a few hours at most to finish and would make a great gift. If you prefer a longer slouch to your hat see my earlier post for the The Perfect Slouch Hat!

Things you'll need...


Green Knifty Knitter Loom (or 36 peg loom)
Knitting Tool
1 Skein Paton's Shetland Chunky Yarn; Color:  Harvest Variegated
Crochet Hook

Pattern...


  1. Chain Cast on
  2. knit 14 rows (do not e-wrap)
  3. Flip up stitches to form brim
  4. e-wrap knit until hat reaches 9" or desired length
  5. remove hat from loom using gathered bind off
  6. weave ends into knitting

Enjoy your new hat!
#crafts


#loomknitbeanie #loomknitslouchhat #loomknitting #knithat #loomknithat

Disclaimer:  I have made every effort to ensure that these instructions are accurate and complete.  I cannot, however, be reponsible for human error, typographical mistakes, or variations in individual work. 
Copyright, 2013, Nicole F. Cox, thismomentisgood.blogspot.com, all rights reserved


One month (30 days) of easy crock pot ideas...


Today I made one of my favorite dishes...Pork & Sauerkraut.  I love the taste and appreciate how easy the dish is to make, only two ingredients! I make this dish every New Years Day.  A dear, old friend told me that it's supposed to be good luck.  I've been making it ever since. It got me thinking, how many other easy slow cooker recipes could I come up with.  The criteria was that they have less than five ingredients and required very little preparation.  I didn't include water or spices as ingredients but you'll find that most of these dishes have less than that even while including these items.  Serve these dishes with a side dish, bread, pasta or rice, use your imagination. Season them to taste.  It's the ultimate, lazy cooks guide.

NOTE: Many of these recipes contain canned soups and seasoning packets. These ingredients are often high in sodium.  There is a solution to this problem.  Get the book Make-A-Mix.  It gives you dry recipes for condensed soups, seasoning mixes and also tips for browning and freezing meat ahead of time.  You can control the amount of sodium you put into their recipes. I have found it to be a go to resource and use it all the time.  For the canned ingredients, I only buy the no salt added versions.


1.  Pork & Sauerkraut - 1 pork loin (any size) & 1 bag refrigerated sauerkraut
2.  Cheesy Mexican Chicken - 4 chicken breasts, 1 can Cheddar soup, 1 cup (or more) salsa.
3.  Meatballs with Sauce - 1 bag frozen turkey/beef meatballs, 1 jars pasta sauce, 2 cans diced tomatoes.
4.  Mock Chicken Cordon Bleu - 4 chicken breasts, 4 pieces of Swiss cheese, 4 pieces of ham, Cream of chicken or mushroom soup (place ham & cheese inside flattened chicken breast)
5.  Onion Pork chops - 4 pork chops, 1 envelope onion soup mix, 10-14 ounces chicken broth
6.  Maple Chicken Dijon - 4-6 chicken breasts or drumsticks, 1/4 cup Dijon mustard, 2 TBS balsamic vinager, 1/4 cup pure maple syrup, 3/4 tsp. garlic salt & pepper.
7.  Italian Chicken & Potatoes - 4 red potatoes diced, 4-6 chicken breasts, 1/2 cup zesty Italian dressing, (salt to taste, 3/4 tsp oregano)
8.  Mexican Pork - Pork roast or loin, 1-2 cups salsa, 1 can pinto or black beans rinsed.
9.  Saucy Slow Cooker Beef - 1 lb. stew meat or sirloin (cubed), 1 can tomato soup, 1 can cheddar cheese soup.
10.  French Dip Sandwiches - 2 lbs beef brisket, 1 envelope onion soup mix, 10 oz. beef broth.
11.  Taco Chicken - 1 lb. chicken, 1-2 cups salsa, 2 TB. taco seasonings.
12.  Pulled Pork Sandwiches - 3-4 lb pork butt roast, 2 onions sliced or chopped, 16 oz prepared BBQ sauce.
13.  Pulled Chicken - 4-6 Chicken breasts, 1 onion chopped, 16 oz prepared BBQ sauce.
14.  Sweet BBQ Ribs - 3 lbs pork loin back ribs, 1/2 cup coke, 1 cup BBQ sauce (1/2 tsp Italian spice, 1/2 tsp salt, 1/4 tsp pepper)
15.  Ranch Pork Chops - 4-6 Pork chops, 2 cans cream of chicken soup, 1 packet ranch dressing, 1 cup mushrooms.
16.  Easy Pot Roast - 2.5 lb roast, 2 cups chopped carrots, 2 cups chopped potatoes, 1 cup celery, 3 cups beef broth (season to taste)
17.  White Turkey Chili - 1 lb ground turkey cooked, 1 packet white chili seasoning, 1-2 cans white beans drained & rinsed.
18.  Easy Red Chili - 1 lb. ground beef/chicken/or turkey, 2 cans kidney beans, 1 can diced tomatoes, 1/2 cup chopped onion, 1 can tomato sauce. (3 TB chili seasoning)
19.  Corned Beef and Cabbage - 1 (4) lb. corned beef brisket with spice packet, 10 baby red potatoes, quartered, 1/2 head cabbage; coarsely chopped, 1 onion coarsely chopped, 6 oz beer, 1 cup carrots (add 4 cups water)
20.  Orange Chicken - 4-6 chicken breasts, 1 cup orange marmalade, 1 cup BBQ sauce, 3 TB soy sauce.
21.  Mexican Chicken - 4 chicken breasts, 14 oz corn, 2 cans rotel, 1 can black beans.
22.  Slow Cooker Ham - 1 bone-in ham, 1 20 oz can crushed pineapple, 1/2 cup brown sugar, 1/2 cup orange juice.
23.  Easy Chicken & Dumplings - 4 chicken breasts, 2 cans cream of chicken soup, 1 onion, finely diced, (add enough water to cover), 2 10 oz. packages refrigerated biscuit dough; torn into pieces (added 30-40 minutes before serving).
24.  Thai Chicken - 1 16oz. bottle Asian toasted sesame dressing, 1 TB chili paste (Thai), 1 TB ginger garlic paste, 2 TB peanut butter, 6 chicken breasts.
25.  Creamed Chipped Beef (on toast) - 2 package dried corned beef, 2 cans cream of mushroom soup.
26.  Pepper Steak - 1 lb. sirloin cut up, 1 large Spanish onion, 12 oz beef gravy, 1 envelope beef gravy mix, 1lb. bag frozen bell peppers.
27.  Mexican Beef Stew - 2 lbs. stew meat, 1 can whole tomatoes (undrained), 1 cup frozen whole onions, 1 can black beans, 1 can corn (3 Tbs. taco seasoning)
28.  Pork Roast & Stuffing - Pork Loin or pork chops, 3/4 cup chicken broth, 1 package stove top stuffing (added at end of cooking; Pour out any excess liquid out of slow cooker...you don't want more than directed on package)
29.  Ham & Cheese Dinner - 28 oz frozen diced potatoes with onions & peppers, 2 cups shredded cheddar & monterey jack cheese, 1 can cream of celery soup, 8 ounces sour cream, 3 lb. fully cooked smoked boneless ham (place on top of mixture)
30.  Chunky Chicken Chili - 2 lbs boneless, skinless chicken thighs, 2 cans diced tomatoes with green chili's (undrained), 1 15 oz can tomato sauce, 2 15ounce cans hominy, 1 envelope chili seasoning mix (top with sour cream & cilantro if desired)

NOTE:  Cook all the above recipes until the meats reach desired internal temperature.


#slowcookerrecipes #crockpotrecipes #5ingredientorlesscrockpotrecipes #5ingredientslowcookerrecipes #recipes #easycrockpotrecipes #3ingredientcrockpotrecipes #30dayscrockpotrecipes

Copyright,2013, Nicole F. Cox, thismomentisgood.blogspot.com, all rights reserved.

Sweet Bows to add accents to your projects...


#loomknitting #bows #loomknitbows

My husband and I had a busy weekend which has left me pretty tired today. For today's project, I wanted something easy and quick.  Recently I found a pin on Pinterest that had a cute picture of crochet bows. When I clicked on the pin, as often happens,  it said "suspicious link".  I decided I would try to make them myself.  They came out pretty close to the picture I had seen and I'm pretty happy with them.  The pattern makes a 3" bow.  For the yellow bow, I used two strands of yarn as one.  For the blue bow, I used one strand of yarn. I wanted to show you what each would look like if you needed different thicknesses for your projects.  I think they would be really cute added to a little girls hat or maybe make a wreath of them in different colors.  Let me know if you have any questions about this project.

What you'll need:


Any color yarn/thickness to match your project
round loom
knitting tool
crochet hook
scissors

Directions:


Chain Cast on 15 pegs
Row 1:  knit across (do not e-wrap your stitches in this project)
Row 2-7: knit, purl, knit, purl, etc. across
Row 8: knit
Bind off leaving30" of yarn
Fold in half to find center...
Bring both ends in to meet at center...
Pull your ends through to hold fold...
Knot shorter strand and weave into knitting...
Now pull long strand up through center of bow...
wrap long strand around center of bow, while adding some tension...
Knot strands in back of bow, leaving tails for sewing on to project...

I hope you enjoy these cute little bows!
Thanks for reading!

Disclaimer:  I have made every effort to ensure that these instructions are accurate and complete.  I cannot, however, be reponsible for human error, typographical mistakes, or variations in individual work.  I am not a professional pattern writer.  Although these patterns have been tested by me, they are still considered test patterns because they have not been done by a large group of knitters. They are being shared free for this reason.  Please knit these patterns at your own risk.


Copyright, 2013, Nicole F. Cox, thismomentisgood.blogspot.com, all rights reserved


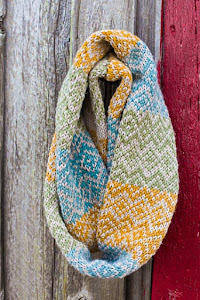
Earth Toned Scalloped Scarf/Cowl With Metal Buttons...


I was feeling experimental today and decided to try and see if I could knit a deep scalloped edge on a loom scarf.  I'm becoming kind of bored with the straight edge.  To my surprise, I got it on the first try.  Now I had to decide what color I would make it.  I love earth tones so I dug out some fisherman colored yarn I had.  I like the way the cream and brown blend together. Because I changed colors so often, I knew I wasn't going to want to weave all those ends of yarn into my project later so at each color change I hand wove the ends in as I was knitting.  This worked out perfectly...my ends were hidden and I had no extra work to do at the end of the project.  I tried to make the directions as clear as possible and hope that you can follow them.  I did end up with a dropped stitch at each button hole which I hand stitched closed without a problem.  I put a close-up picture of the holes in order for you to see how they turned out.  It took me about 6 hours to do this with the time it took to think out the pattern included.  Good luck with it.  I'm sure it would look great in any combination of colors! #Loomknitpattern


Things you'll need:

(2) Metal Buttons
Straight Loom (I used Knifty Knitter)
1 Skein Wool-Ease Thick & Quick, Color: Barley
1 Skein Wool-Ease Thick & Quick, Color: Fisherman
Knitting Tool
Crochet Hook

Directions:

-With 1 strand of Barley, cast on 11 pegs (Straight Loom e-wrap)
-Counting from left to right...
-Move Yarn from Peg 3 to 2
-Move Yarn from Peg 4 to 5
-Move Yarn from Peg 8 to 7
-Move Yarn from Peg 9 to 10
-Do this on top and bottom row 
-Pegs 3,4,8,9 on both sides should be empty
-Move the long stitches inside pegs 3-4 & 8-9 to outside of loom (on both sides of loom) see picture


-e-wrap knit pegs that have two strands of yarn on them
-e-wrap all pegs
-e-wrap knit Pegs 1-2, Purl pegs 3-4, e-wrap knit pegs 5-7, purl pegs 8-9, e-wrap knit 10-11
-e-wrap knit 3 rows

-[cast on with one strand of Fisherman (brown)]
-[e-wrap knit 3 rows]
-[cast on with Barley (cream)]
-[e-wrap knit 4 rows]
-repeat above  [in brackets] 10 times
-cast on with one strand of Fisherman (brown)
-e-wrap knit 3 rows
-cast on with Barley (cream)
-e-wrap knit 3 rows

-Counting from left to right...
-Move Yarn from Peg 3 to 2
-Move Yarn from Peg 4 to 5
-Move Yarn from Peg 8 to 7
-Move Yarn from Peg 9 to 10
-Do this on top and bottom row 
-Pegs 3,4,8,9 on both sides should be empty
-Knit pegs
-Move the long stitches inside pegs 3-4 & 8-9 to outside of loom (on both sides of loom)
-e-wrap all pegs
-e-wrap knit Pegs 1-2, Purl pegs 3-4, e-wrap knit pegs 5-7, purl pegs 8-9, e-wrap knit 10-11
-button holes and smaller scalloped edge will form
-cast off loom
-Hand stitch any dropped stitches around button holes
-Sew on buttons, using picture for placement

Close up of Knitting, button holes, buttons & scalloped edges

Thanks for Reading!


Disclaimer:  I have made every effort to ensure that these instructions are accurate and complete.  I cannot, however, be reponsible 
for human error, typographical mistakes, or variations in individual work.  
 Please knit these patterns at your own risk.
#loomknitting #freepattern #knitting #scarf #cowl

Copyright, 2013, Nicole F. Cox, thismomentisgood.blogspot.com, all rights reserved


Warm & Cozy Loom Knit Scarf...


If you've read my earlier posts, you know I'm on a mission to make all of my relatives & close friends a home made gift. As the days tick by and Christmas is just around the corner, I'm starting to realize that it might be overly ambitious. There are going to be a few people I'll have to buy gifts for this year.  No worries, I'll make it up to them next year!  I have a dear friend, Vivian, who is very elegant so I wanted to make her something feminine and also practical for winter.  Since I want each gift to be unique, I needed to learn a new stitch pattern for the scarf I planned on making her.  After some research, I decided on the honeycomb stitch.  It sounds complicated but once you learn the box stitch, it's really easy.  The honeycomb appears by constantly reversing the box stitch.  Keeping count of your rows is also necessary if you want it to look even.  The finished scarf has a really unique look to it!

What You'll Need:


3 Skeins Grey/Marble Yarn (4)
Long Loom (with atleast 12 pegs)
Knitting Tool
Crochet Hook

Directions:


-Cast on 12 pegs, using 2 strands of grey as one, in the box stitch pattern (shown below)


-e-wrap knit (9) rows (I've demonstrated it using just one strand to make it clear)

-Now, reverse your stitch, using the wrap shown below

-e-wrap knit (9) rows


-Continue reversing your stitch every (9) rows until your scarf measures 64 inches (or adjust length)


-Make fringe by wrapping yarn around cardboard (cardboard should measure 4 1/2" by 6") then cutting at top of cardboard.  Add 5 strands to the base of each stitch column.

#Loomknitting #Loomknitscarf #honeycombstitch #Knitscarf


Let me know if you have any questions!


Disclaimer:  I have made every effort to ensure that these instructions are accurate and complete.  I cannot, however, be reponsible  for human error, typographical mistakes, or variations in individual work. 


Copyright 2013, Nicole F. Cox, thismomentisgood.blogspot.com, all rights reserved.

Powered by Blogger.