Printfriendly

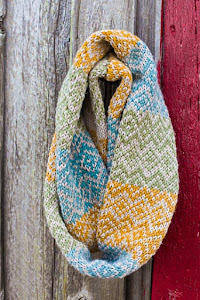
First of all, Happy Bodhi Day to all!  Today I'm extra thankful for all the good things in my life!  Our name This Moment is Good, gets its special meaning from Buddhist teachings. One of the things I'm feeling extra grateful for are these fantastic looms I received in the mail this week.  They are CinDWood Looms.  I wanted to share some pictures of them and some of my thoughts about their design. If you loom as much as I do, you need well made looms that make your knitting easier! CinDWood Looms are perfect because they come in multiple gauges, 1/2", 5/8" and 3/4".
#cindwoodlooms #freeloomknittingpatterns #loomknitting #loomreviews #loomknittingpatterns #loomknit #knittinglooms #roundknittinglooms #woodroundknittinglooms

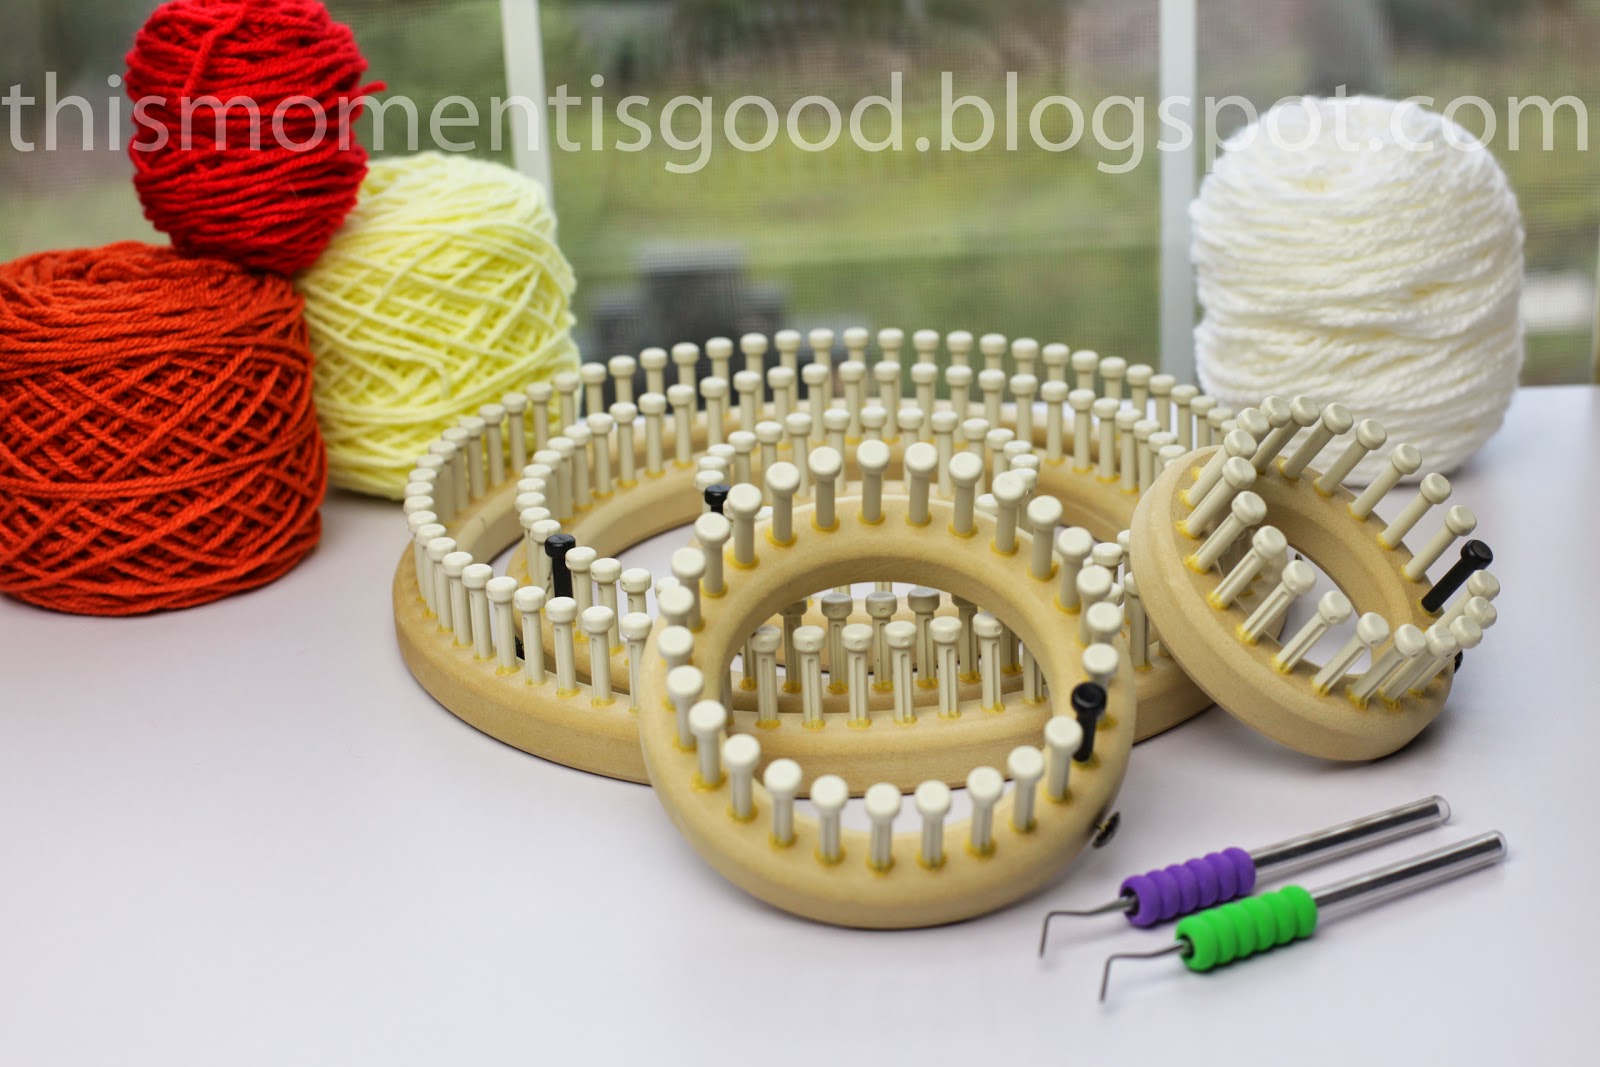
CinDWood round looms and picks, 1/2" peg spacing.
Above are 5 different loom sizes in the 1/2" peg spacing.  This small gauge loom allows you to use 1 strand of yarn in many different weights.  This means less expense for us loomers and a tighter knit. The pegs have a nice size head which holds your yarn firmly on the loom as you knit.  It can take a couple rows to get used to these different pegs when you switch from the plastic looms to CinDWood, it's not quite as smooth a transition as the molded plastic looms like knifty knitter.  Although, after a couple rows, I did not notice the difference.
Along with the looms, you get a pick or two with a great cushioned handle.  The pick is sharp so I think it might be best for lighter weight/thinner yarns. I have not used it yet but hope to this week.

Close up of a small CindWood round loom, 1/2" peg spacing.
The holding peg has a large head and I find that it's best to wind your yarn around it instead of using a slip knot.  The slip knot can tighten and be very difficult to get off of the large head.  If you prefer a slip knot then leave your tail longer than usual and cut it.  One thing for sure, you won't have to worry about your yarn slipping off of this holding peg. There is a nice groove in the peg for picking up your yarn quickly.  The base is made out of MDF, which is surprisingly light and smooth. They have many loom sizes and shapes.  Right now I am focusing on the round loom in my pattern designing so that's why I'm specifically writing about CindWood Crafts round loom but you can get rakes and serenity looms from them too.

I love that this is a family run company!  They have excellent customer service and have answered all my questions and shipped my looms quickly.  I hope you try these looms!  Here is where you can find them:  http://www.cindwoodcrafts.com/
CinDWood Round Looms
THANK YOU FOR READING AND HAPPY LOOMING!

copyright, 2014, thismomentisgood, Nicole F. Cox, all rights reserved. I have not been paid or asked to write this review.
What football lover wouldn't want this cute headband?  We all know how cold it is at the local or professional game so it also serves a practical purpose of keeping your head warm.  This extra wide headband would make a great gift or stocking stuffer too for this holiday season.  It knits up quick and is an easy beginner pattern.  I hope you enjoy this new Football Themed Free Loom Knitting Pattern!
#freeloomknittingpatterns #loomknitfootballthemedheadband #loomknitheadbandpattern #loomknitting #headbands #knitheadbands #footballheadband #headbandpattern
FREE LOOM KNIT FOOTBALL HEADBAND PATTERN

LOOM KNIT HEADBAND PATTERN, FREE FROM THIS MOMENT IS GOOD BLOG!

LOOM KNIT FOOTBALL HEADBAND

Supplies:

  • Any loom that fits your head snug (green KK loom used in sample)
  • Knitting tool
  • Crochet hook
  • Measuring tape
  • Yarn:  Any type, brown colored yarn, 2 strands (4) weight or 1 strand Bulky weight (Mill ends used in sample. Any type white yarn for laces.
Pattern:

  • Chain cast on all pegs; join to work in the round
  • Row 1:  ewk
  • Row 2:  purl
  • Rows 3-:  repeat rows 1 and 2 until headband measures 3".
  • Chain one bind off.
  • Top stitch laces onto headband-refer to picture. Side lines were double stitched and then yarn was woven in and out to give it a twisted look.
HAPPY LOOM KNITTING!


copyright, 2014, thismomentisgood, Nicole F. Cox, all rights reserved.  Please link to this blog, do not copy and paste content.
This week I finished up two new vintage style hats for the Etsy Store!  Vintage seems to be very "in" right now and there's not many patterns out there for loom knitters so I worked hard this fall to design a couple patterns that I thought loomers might like.  One features the Puff Stitch, which I haven't seen in looming until now!  The other hat has an overlapping hat band. Both patterns will introduce a new technique or stitch.  I hope you enjoy these new hat patterns!
#loomknittingpatterns #freeloomknittingpatterns #ladiesloomknithats #loomknitting #loomknitvintagehatpatterns #loomknithatpatterns

Vintage Style Loom Knit Ladies Hat!

Loom Knit 1920's Style Cloche Hat!


You can find these patterns and more at my Etsy Store:  This Moment is Good on Etsy
And
as always check out this blog for free loom knitting patterns and other crafts!

copyright, 2014, thismomentisgood, Nicole F. Cox, all rights reserved.  Please link to this blog, do not copy and paste content.

I've been working hard to bring my readers and fellow loomers more hat patterns this winter! Here are three more patterns that are now available on the Etsy Store!
#loomknithatpattern #loomknitladieshat
#loomknitribbonhat #freeloomknittingpatterns
#elegantloomknithat

#loomknitsplitbrimhat #loomknithat #loomknitearflap
#loomknitearflaphat 


#loomknitberetpattern #loomknitslouchhatpattern #loomknitslouchyhat
#loomknitslouchybeaniepattern #loomknitbeaniepattern
#ladiesknithatpattern #loomknittingpatternsforsale

HAPPY LOOMING! You can find these patterns and more on my Etsy Store Here:  thismomentisgood on Etsy
And as always look for our FREE LOOM KNITTING PATTERNS on this blog!

Copyright, 2014, thismomentisgood, Nicole F. Cox, all rights reserved.  Do not copy and paste content; links to this blog are permissable.


Today I put up a new pattern on my Etsy Shop!  It's for this elegant loom knit ladies winter hat.  It can easily be knit in any size on a loom with an even number of pegs.  The hat can be loom knit in one evening so it makes a perfect last minute gift idea.  I'm really excited about this pattern, I think it's a fun, stylish twist to the boring winter hat! Please let me know if there are other hat patterns you'd like to see in the future.

#loomknithatpattern #loomknitting #loomknitwinterhat #loomknitberet #loomknitting #patterns #freeloomknittingpatterns #loomknitberetpattern #loomknithatwithribbon

You can purchase this pattern here: Loom Knit Ribbon Hat Pattern

HAPPY LOOMING!

copyright, 2014, thismomentisgood, Nicole F. Cox, all rights reserved.
My life is so busy right now that I don't always have time to do my hair. I'm bored with ball caps so I've decided to knit some pretty headbands to wear instead.  Headbands are cute and they also keep your head extra warm during the cold months of winter.  This is one of the patterns I came up with.  This pretty headband can be loom knit in one evening.  I hope you enjoy this pattern as much as I do!

#freeloomknittingpatterns #loomknitheadband #loomknitearwarmer #knitearwarmer #loomknitheadbandpattern #free #headband #pattern #loomknit #headwrap #knottedheadband #turban 


LOOM KNIT TWISTED HEADBAND PATTERN

Supplies:
  • Medium gauge loom (purple KK loom used in sample), if using a large gauge loom use 2 strands yarn instead of 1.
  • Knitting tool
  • Crochet hook
  • Measuring tape
  • Yarn:  MC:  Any 4-ply yarn is fine for this pattern.  Lion brand, Vanna's Choice Baby, (4); Color:  Goldfish (used in sample)
  • Yarn needle
Pattern:  Pattern works counter clockwise.
  • Chain cast on pegs 1-6 with 1 strand MC.
  • Row 1:  k
  • Row 2:  ewk
  • Repeat rows 1 and 2 (6) times.
  • Cut working yarn.
  • Chain cast on pegs 7-12 with 1 strand MC.
  • Repeat above directions starting with row 1 but do not cut working yarn.
  • Now begin working in long rows over pegs 12-1.
  • Row 1:  k
  • Row 2:  ewk
  • Repeat rows 1 and 2 until knitting measures 15 inches.
  • Begin knitting in short rows over pegs 12-7.
  • Repeat rows 1 and 2 (5) times.
  • Cut working yarn.
  • Begin knitting in short rows over pegs 1-6. Start with peg 1.
  • Repeat rows 1 and 2 (5) times.
  • Next row:  k
  • Next row:  k
  • Bind off using gather method.
  • Gather knitting then secure.
  • Now place first section of knitting through loop and seam the 2 sides together.

ENJOY YOUR NEW HEADBAND AND HAPPY LOOMING!

2014, copyright, thismomentisgood.blogspot.com, Nicole F. Cox, all rights reserved.  Please do not copy and paste this blog post, links to this blog post are acceptable.
This pattern is for a men's ribbed beanie cap.  It is thinner than a ski cap, so it's perfect for fall and early spring!
#freeloomknittingpatterns #loomknitmensbeanie #loomknithatpattern #mensloomknithat #loomknittingpatterns #freeknittingpatterns #mensbeanie #mensribbedbeanie 


LOOM KNIT MEN'S RIBBED BEANIE

SUPPLIES:

  • Large gauge loom (41 peg)- Yellow KK loom used in sample
  • Knitting tool
  • Crochet hook
  • Yarn:  MC:  Any 5-ply yarn is acceptable for this pattern.  Patons Shetland Chunky (5); Color:  Deep Moss, used in sample
  • Tape Measure
PATTERN:

Pattern Notes:  The large loom used in this pattern will seem too big when first starting this pattern.  Don't worry, ribbing shrinks as it is knit!  This hat will be a normal men's size when finished.  You may work clockwise or counterclockwise.
  • Chain cast on all pegs with one strand of MC, join to work in the round.
  • Row 1:  *k1, p1, repeat from * until last peg, k1.
  • Repeat row 1 until knitting measures 8 inches.
  • Bind off using gather method.
I hope you enjoyed this pattern!  Happy Loom Knitting!

2014, copyright, thismomentisgood.blogspot.com, Nicole F. Cox, all rights reserved.  Do not copy and paste this post, links are acceptable.
This pattern is now available on the Etsy store located here:  Pet Stocking Pattern For Loom Knitters

#loom knit pet stocking pattern #loom knit christmas stocking pattern #free loom knitting patterns #loomknittingpatterns
#loomknitdogstocking #loomknitcatstocking

Once complete this item will make an adorable stocking for your favorite pet or a large bag for a child's favorite things.  The pattern is available for $3.99 on my Etsy Store.  Click the link above for more details! And, as always, there are free patterns available on this blog.

Thanks For Reading!  Happy Looming!

2014, Copyright, Nicole F. Cox, thismomentisgood.blogspot.com, all rights reserved.

Happy Memorial Day to All...I hope everyone has an amazing kick-off to summer!
#loomknitpatrioticmugcozy #mugcozy #loomknitmugcozypattern #freeloomknittingpatterns

This has been a busy month on the blog...
     It's been a fun month of preparing for Memorial Day and barbeques.  I've also enjoyed getting back into the garden and getting my hands into the soil.  There's nothing more satisfying then a day of hard work out in the fresh air.  I've also introduced a few new loom knitting patterns on the Etsy Store; a swimsuit cover-up pattern, 2 bag holder patterns, (7) wash cloth patterns and a market bag.  All were designed as summer knits, made out of 100 % cotton.

     Now let's have some fun...If your email starts with angelinamaria, you have won a free pattern from our Etsy Loom Knitting Store.  Just contact me at the email address at the top of this page and let me know which pattern you would like and it will be emailed to you!  Patterns must be valued at $5.99 or less.  Just follow the link on the right of this post to the Etsy store.  Remember you only have 30 days to claim your free pattern.

     Below is a new Free Pattern for a Patriotic Loom Knit Mug Cozy.  It was inspired by the upcoming Memorial Day Holiday.  I've seen these all over Pinterest and wanted to make one myself for a long time.  I LOVE my coffee in the morning and like it piping hot.  These cozies are a perfect, cute addition to my coffee addiction. I hope you find this pattern useful...I think it would make a great hostess gift.  Just fill the mug with a gourmet coffee/tea or candies.

PATRIOTIC LOOM KNIT MUG COZY PATTERN


SUPPLIES:
  • Yarn:  100% Cotton (4-ply); Colors:  Red, White, and Off White
  • Any medium/large gauge loom with atleast 11 pegs (blue knifty knitter was used)
  • Knitting Tool
  • Crochet Hook
  • 2 Buttons
  • Optional:  Pins for blocking
PATTERN:
  • Measure around mug, leaving out handle area.  Write measurement down.
  • Chain cast on 11 pegs with 2 strands off white.  Use more or less pegs if your mug is larger/smaller. Peg #'s determine height of cozy. This pattern fits a large mug measuring 4 1/2" inches in height.
  • Rows 1, 3, 5:  knit
  • Rows 2, 4, 6:  purl
  • Change to red.  Cut off white.
  • Repeat rows 1-6.
  • Change to blue.  Cut red.
  • Repeat rows 1-6.
  • Keep repeating above until knitting measures above measurement or a little less (less if your mug narrows dramatically at the bottom).
  • Chain one bind off.
  • Weave in all ends.
  • Now make a loop with yarn at the bottom of mug cozy, knot and secure.  Do the same with top of mug cozy.  Note:  if your mug narrows at the bottom then make the bottom loop smaller than top loop.  Your cozy will lie better on the mug.
  • Block Cozy, if desired.  Sample was blocked by wetting and pinning to an ironing board.
  • Sew buttons on opposite side of mug cozy.  Placing buttons where the loops will have to stretch to reach over buttons so mug cozy remains secure on mug when in use.

Enjoy Your New Mug Cozy and As Always, Thank You For Reading!


2014, copyright, www.thismomentisgood.blogspot.com, Nicole F. Cox, All Rights Reserved.  You are welcome to link to this blog post but DO NOT copy and paste content.


This Southwest style crock pot chicken is delicious & easy! 

 Let me first say that I usually hate Southwestern style food.  It's either too smokey or sweet for me, all the things my husband loves.  Today I decided to make something we both would like...I knew I hit a home run when my husband said "this is really good!  Make sure you write it down."  He said that because I have a bad habit of forgetting my recipes.  I'm an optimist and think, of course I'll remember what I did.  Recently I've started to listen to him and write down a good recipe as soon as I make it.  I hope you enjoy this dish as much as we did.  It's easy...just fix it and forget it!

#southwesternchickenrecipes #southwestchicken #crockpotchickenrecipes #recipes 
#slowcookerchickenrecipes #slowcooker #crockpotrecipes

Ingredients:


  • 1/2 jar Southwest style black bean salsa
  • (1) 14 ounce can Stewed Tomatoes
  • (1) 14 ounce can Black Beans (rinsed and drained)
  • 1 1/2 teaspoon Taco Seasoning (I make my own so it's lower in sodium)
  • 1 small can chopped Green Chilies
  • 3 Frozen Chicken Breasts
  • 1 Tablespoon Dried Parsley
  • 1 small can sliced Black Olives
  • Egg Noodles
Place chicken breasts at the bottom of the slow cooker.  Place all remaining ingredients on top of chicken except olives and egg noodles.  Set slow cooker to low and cook for 6 hours (or more if chicken is not done).  Add black olives right before serving.

15 minutes before serving, make egg noodles as directed on package.  Place noodles at the bottom of bowl and ladle chicken mixture on top of noodles.  Serve and Enjoy!

THANK YOU FOR READING!

2014, Copyright, thismomentisgood.blogspot.com, Nicole F. Cox, all rights reserved.  You may link to this post but do not copy and paste content.
We always look forward to Memorial Day weekend.  Whether we go camping or barbecue at home, it's always a fun time for us.  It's also the weekend we celebrate our daughters birthday.  This year we are planning a small family barbecue at our house.  I wanted to have all the preparations done a week in advance.  We have another family barbecue that weekend which will require about 5 hours driving. 
#patrioticdecomeshwreath #patrioticwreath #memorialdaydecorations #springgarden #4thofjulydecorations

     I spent the morning making the Patriotic Deco Mesh Wreath you see above.  I decided to keep it simple, with just a flag in the center.  Then I planted more annuals in pots and placed them on my porch.  I also put a few impatiens in an old watering can that I've had in my garden for years.  I added a flag to one of the pots and a country cottage sign I found in my travel trailer and I was done with the porch. 
     Our garden is in full bloom right now...I always get distracted from my "to do" list and start wandering around looking at my plants and planning my next gardening project.  The hydrangeas and ajuga are in full bloom next to our porch.  The phlox is thick and spreading nicely under one of our remaining Oak trees in the front yard.  Sadly, we lost most of our big Oaks during the storms here in New Jersey over the last few years.  The Day Lilies and Irises are waiting to bloom next to the Azaleas.  Spring is such an exciting time for a gardener.  No wonder I get so distracted!
I ended my day with a trip to the dollar store to get some more small flags and decorations for my mailbox.  I'll post more pictures in a later post!

THANK YOU FOR READING!  HAVE A GREAT DAY!

2014, copyright, thismomentisgood.blogspot.com, Nicole F. Cox, all rights reserved.  You are welcome to link to this blog but do not copy and paste content.


Happy Mothers Day To All!

It's a yearly tradition for my husband and I to spend Mother's Day weekend getting back into our garden and getting the yard spruced up for summer.  This year we worked on a project I've been wanting to do for 15 years!  I'm beyond excited...We finally put in drip irrigation to the window boxes and hanging baskets on the porch.  No more daily watering these hard to reach places. 
#gardening #windowboxes #dripirrigation 

Annual Flowers, Hanging baskets, My husband installing Drip Irrigation, Pottery


     One of my favorite things are window boxes.  I love when the flowers spill over the sides and the plants grow high enough to be seen from inside the house.  As much as I love the look of window boxes, I hate watering them.  Our window screens do not open so you can't do it from inside.  I had to direct the hose up at them and hope some of the water actually got in the boxes.  The plants would soon become stressed from drying out or my forgetfulness.  Not to mention that it was a colossal waste of water doing it that way. I looked into getting drip irrigation kits but they were between $200 and $300.  Needless to say, I didn't want to spend that much.  

     Today we took a trip to Home Depot and looked in the plumbing section and found all the supplies we needed to do it ourselves;  1/4" clear hose, fittings and a timer.  It cost less then $70.00.  I already had a husband brave enough to climb up on a ladder and run the line to all the boxes.  He put 4 drips to each box for even watering.  I planted all the annuals in the boxes and pots while he did this.  Four flats of annuals were enough to fill 3 window boxes and all the pots you see.  I even have some plants left but did not get them planted because a storm came through.  I try not to over fill my boxes and pots.  I like them to have room to grow.  I wished I'd known years ago how easy, fun and cheap this project could be!

     I hope everyone has a Happy Mother's Day and you get to spend the weekend doing something you love!

Thank You For Reading!

2014, Copyright, thismomentisgood.blogspot.com, Nicole F. Cox, all rights reserved.  Please link to my blog but do not copy and paste content.


This pretty rose uses my new scallop/crocodile stitch...

     I've spent the last month trying to mimic the crochet crocodile stitch with varied success on the loom.  I've settled on a stitch that looks more scalloped than the pointed tips of the crochet version.  I'm hoping that some day I or some other pattern designer will be more successful with getting the stitch even closer to the original version of the stitch.  I'm pretty happy with it and am glad to have this stitch in my arsenal now!  I wanted to share it with you because I think it opens up more creative avenues for us loom knitters.  So far I've done two patterns using this stitch.  One pattern is a baby bootie and the other is a slipper sock.  I have been wearing my slipper socks every day since I made them.  They are really cute!  I've also made fingerless gloves using the stitch but have yet to get the pattern written.  Below is the pattern for the rose and you can find the other patterns by clicking on the mini Etsy Store link on the right hand side of this post.
#freeloomknittingpatterns #loomknitrose #loomknitflowers #loomknitcrocodilestitch #loomknitflowerpatterns


LOOM KNIT ROSE

SUPPLIES:
  • Any yarn (sample uses Vanna's Choice (4), Color:  Mint)
  • Any loom (sample uses 42 pegs and makes a large 4" rose, pegs must be in multiples of 3 to use this stitch)
  • Knitting tool
  • Crochet hook
  • Yarn needle
  • Button for center of rose (optional)
Key:  Scallop Stitch/Crocodile Stitch

Scallop Stitch (SS):  Worked over 3 pegs.  E-wrap knit peg (1) 6x's (unless otherwise noted in parenthesis after abbreviation for stitch, example; SS (7).  Move stitches from peg (1) to peg (3). e-wrap pegs (2) and (1).  EWK pegs 1, 2, and 3.  Now, lift the connecting stitch before peg (1) and place it on peg (1).  Right side of knitting will be inside loom (inside out).  Repeat on next 3 pegs.


  • Crochet/Chain Cast on 42 Pegs.  You can alter number of pegs for a smaller rose, just make sure to count in 3's.  This pattern makes a large 4" rose.
  • You will only knit one row using the scallop stitch above...
  • Row 1 (pegs 1-21):  SS (7)
  • Row 1 (pegs 22-42):  SS (5)
  • Row 2:  purl
  • Row 3:  knit
  • Chain one bind off.
Now thread a long piece of yarn through a yarn needle.  Start spiraling scallops into a circle pattern starting from the inside of your rose and sew to secure as you go. You can play with it and either leave it flat as in the sample or overlap it more.  You can leave your rose plain or place a button in the center as an accent.


Examples of things that can be made using this stitch...You can vary the color of yarn used for endless looks.

Thank You for Reading.  Happy Loom Knitting!

2014, Copyright, www.thismomentisgood blogspot.com, Nicole F. Cox, all rights reserved.  Patterns are for personal use only.  Do not copy or share these patterns.  It is okay to link to these patterns as long as the patterns are not copied.


·         
An Easy, Healthy and Delicious Version of this Soup!

Today the blog hit 100,000 page views in just under six months time, Woo Hoo!  To celebrate I'm making a pot of Italian Wedding Soup.  This is a really easy version of this soup.  I can make it in under thirty minutes. I do not pre-cook my meatballs.  I let them cook in the broth all day on a low setting.  This makes the broth even tastier and the meatballs super tender.  If you prefer a crusty coating on your meatballs just bake in a 350 degree oven for thirty minutes prior to adding to the broth.  A Note about placing raw chicken into cold broth;  the broth will get a grainy appearance, which can be unattractive.  Heat your broth to boiling before placing in crock pot and this will lesson the graininess. You can add dill or parsley to the broth as seasoning for the soup.  I got the idea for dill from an episode of The Barefoot Contessa/Ina Garten.  Now I alternate my spices depending on my mood.  I don't put sausage in my meatballs to keep them a little healthier but you can if you wish.  I hope you enjoy this recipe as much as I do!
#slowcooker #italianweddingsouprecipe #souprecipes #healthy


SLOW COOKER ITALIAN WEDDING SOUP 
Easy, Healthy & Delicious

Make Meatballs...In a Medium Mixing Bowl add these ingredients:


  • 1 lb of ground chicken or turkey  (or half this and add 1/2 pound sausage)
  • 1/2 tsp Italian seasonings
  • 1/4 cup Parmesan cheese
  • 1/4 tsp garlic salt
  • 1/4 tsp onion powder
  • 1 clove minced garlic
  • 1/4 tsp Pepper
  • 1 large egg
  • Panko bread crumbs (add enough to hold meat together)

Mix above together then roll into small meatballs (under 1/2 inch).  Place into slow cooker.  Meatballs do not shrink so make them the size you'd like them to be when fully cooked.

Add Vegetables and Broth...


  • 1/2 bag of baby spinach (save other half of bag and add to soup later)
  • 3 diced carrots
  • 2 large stalks of celery
  • 1/4 cup fresh dill or parsley
  • 1/4 cup white wine
  • Chicken broth-low sodium or home-made (enough to fill up crock pot)
  • 2 Chicken Bouillon Cubes (low sodium, if you wish)
  • Freshly ground pepper to taste
  • Sea salt to taste
Cook on low for 7 to 8 hours.

Twenty minutes before serving turn slow cooker to high, and add...


  • 3/4 cup small pasta
  • Baby spinach (remainder of bag)

Serve with a crusty bread! Enjoy!


THANK YOU FOR READING!

2014, copyright, thismomentisgood.blogspot.com, Nicole F. Cox, all rights reserved.
Blog Update...

Last month on the Blog, I announced the free Etsy drawing and posted a cute Koala Hat Pattern for kids (easily converted to adult too).  I've updated the categories, in the hopes that topics will be easier to find.  I have also added a static page for loom knitters, called the Loom Knitting Glossary.  To help with following patterns on this blog.  Just look for the tab at the top of every page under the header picture.  To start this month out right, you'll find a free football themed beer cozy pattern at the bottom of this newsletter!

Last month I published several patterns on the Etsy store.  My latest patterns include an iPad/Tablet Cover/sleeve, Holiday Wine Bottle Covers (To give as a gift or to keep) and a new pocketbook pattern.  I hope to keep adding new patterns to the store each week so check back often.  To make it easier for you I've installed a mini Etsy Store button on the right of this blog post.  Please let me know by email if there is a special pattern you would like to see on the blog or in the store!


My Etsy Store Link:  ThisMomentisGood


RUSTIC FOOTBALL THEMED BEER COZY
PATTERN
#freeloomknittingpattern #loomknitbeercozy #footballthemedbeercozy #freeloomknittingpatterns #loomknitting

This cozy knits up quick and is a fun project for the next big game!

SUPPLIES:

  • 1 skein or less Caron Simply Soft Yarn (4); Color:  Chocolate
  • 1 skein or less Lamb's Pride (5); Color:  White Frost
  • Flower Loom - 12 pegs
  • Knitting Tool
  • Crochet Hook
  • Yarn Needle
PATTERN:  Pattern works counter clockwise.  Use 2 strands of chocolate as one throughout pattern and 1 strand of white frost throughout pattern.  See glossary at the top of this page for any terms you are not familiar with.

  • Crochet cast on with chocolate all pegs.  Join to work in the round.
  • Rows 1, 3, 5:  knit (flat knit)
  • Rows 2, 4:  purl
  • Row 6:  EWK
  • Row 7:  knit
  • Change to white.
  • Row 8:  EWK
  • Row 9:  knit
  • Cut White.  Change to Chocolate.
  • Rows 10, 12, 14, 16, 18:  EWK
  • Rows 11, 13, 15, 17, 19:  knit
  • Change to white.
  • Row 20:  EWK
  • Row 21:  knit
  • Cut white. Change to chocolate.
  • Row 22:  EWK
  • Row 23:  knit
  • Rows 24, 26, 28:  knit
  • Rows 25, 27:  purl
  • Bind off.
  • Weave in all ends.
  • Sew laces on center of cozy.  See picture.
I hope you enjoyed this newsletter and the above pattern.
Thank You For Reading and Have a Great Day!!


This is a fun & free hat to loom knit for a child!
Loom Knit Koala Hat Pattern
Sorry I haven't been posting as much as usual but I've been putting a lot of time into my Etsy shop.  Things are going well but I'm still learning to manage my time between the blog and Etsy.  Sometimes I wish I could be two people!  I'm enjoying developing new patterns for the loom and I learn something new every day.  Mostly I've been working on patterns for babies because I could not find many for loom knitting.  I decided that I wanted to make a cute kids hat and came up with this white koala hat.  I was surprised at how real it looks.  The ear flaps are tiny on this hat and just there as an accent so widen/lengthen them if you want a larger ear flap.  It knits up quick and is suitable for a beginner.  I hope you like this pattern!
#freeloomknittingpatterns #loomknittingpatterns #loomknithat #loomknitkoalahat #loomknitkoalahatpattern #freeloomknithatpattern #loomknitchildshatpattern #loomknitting #loomknittingtutorials

SUPPLIES:

  • Red Knifty Knitter Loom
  • Red Heart Buttercup (5); Color:  White
  • Black Yarn (5); any brand
  • Knitting Tool
  • Crochet Hook
  • 2 Large Buttons
  • 2 Smaller Buttons
  • Pom Pom Maker; Medium Size
PATTERN:     EWK = e-wrap knit: The Hat is Toddler/child size and fits up to 19" head.  Use 1 strand of yarn for thinner weave (used in sample)  Two strands of yarn for a thicker/warmer hat.

  • Place Markers on Pegs 7, 8, 9, 23, 24, & 25.  You will be working counter clockwise.
  • Chain/crochet cast on with (1) or (2) strands of white onto pegs 7, 8 & 9.
  • Start 1st ear flap.
  • Rows 1, 3, 5 & 7:   Knit
  • Rows 2, 4, & 6:  Purl
  • Chain/crochet cast on to peg 25.
  • Start 2nd ear flap.
  • Repeat rows 1-7 on pegs 23, 24 & 25 only  (this will create 2nd ear flap).
  • Skip 3 and chain cast on all other pegs on loom.
  • Peg 7 is now your starter peg.
  • Next row:  Purl
  • Next row: knit
  • Next row: Purl
  • Next row:  knit
  • Next row:  Purl
  • EWK around to original starter peg (this should be the center between ear flaps).
  • Cast on one peg with black, knit this peg.
  • With white, skip one peg (peg with black) and then EWK around to original starter peg again.
  • With black, EWK original peg 1 again.  (NOTE:  The black portion of the nose will not look even, you will need to go back later and chain stitch over it.  The stitches will give you a nice outline for where to stitch it later).
  • With white skip one peg again and EWK around to peg before black peg.
  • EWK with black the next 3 pegs.
  • With white, skip 3 pegs and EWK around to 1st black peg.
  • With black, EWK next 3 pegs.
  • With white, skip 3 pegs, EWK around to 1st black peg.
  • With black, EWK next 3 pegs.
  • Cut black but leave a long tail for embroidery on nose.
  • With white EWK around to new starter peg.
  • Now EWK 11 rows.
  • Bind off using gather method.
  • Chain Stitch nose with crochet hook to form the triangle of nose and fill in any gaps.
  • Weave in ends.
  • Make 2 medium pom poms.  Sew on top sides of hat, centered above ear flaps.
  • Use 1 large button and 1 small button for each eye.  Sew on to hat.
THANK YOU FOR READING! HAPPY LOOMING!

2014, Copyright, thismomentisgood.blogspot.com, Nicole F. Cox, all rights reserved.  These are test patterns, knit at your own risk. Patterns on this blog are for personal use only.  Patterns are not to be printed, sold or shared.

Although I rarely work off of patterns that are not mine, I found it helpful to do research on reading patterns and understanding how regular knitting is converted to the loom.  Here are just a few of my notes on converting regular knitting...
#convertingknittingtoloom #knittingconversions #convertingregularknittingtoloomknitting  #loomknitting #loomknittingpatterns #freeloomknittingpatterns


When converting flat panels only:
When a pattern says...Multiples of 6 + 1:  Your rows must be in multiples of 6, plus one ending stitch.
     Example:  6 + 1 = 7
                     6 x 2 = 12 + 1 =13
                     6 x 3 = 18 + 1 =19
     You need to cast on a number of pegs divisible by 6 and then add 1.

When converting patterns in circular knitting:
     Only knit the multiple and omit the number after the plus + sign.

*When regular knitting...Needle knitters flip the knitting each row, loomers do not.  You must do the following when converting a pattern:

Typically the 1st row is the RIGHT SIDE row...if this is the case do this:
  1. Leave all odd rows as they are.
  2. Change all the even number rows to the opposite stitch.  (if they have knits change them to purls, etc.)
However, if the pattern starts with the WRONG SIDE row... do this:
  1. Change all the odd side rows (if they have knits change them to purls, etc.)
  2. Leave all the even rows as they are.

Reading Charts - Flat Panels
  • Chart starts at the bottom right of the first row.  Second row starts at the bottom left.
  • Odd rows start right to left.
  • Even rows start left to right.

Reading Charts - Circular Knitting
  • Read the chart from bottom right
  • All other rows start at the right side (clockwise)
Gauge is important when converting patterns!
  • Knit a 5 x 5 Swatch or larger if knitting a sweater.
  • Measure it for gauge. The math doesn't lie.
  • There is a chart in my book and other loom knitting books that will give you a starting point for what loom is the equivalent to what knitting needle. You can find Round Loom Knitting in 10 Easy Lessons Here!
Examples (flat panel knitting)
Needle Knitting:  Rows 1 and 3 (RS, Right Side) *K5, p5, rep from * to end.
Loom knitting looks like this:  Same as needle knitting because it's the right side and the same side loom knitters work on.

Needle Knitting:  Row 2 and all WS (wrong side) rows *K4, p1, k1, p4, rep from * to end.

Loom knitting looks like this:  *P4, k1, p1, k4, rep from * to end. Change all sts to the opposite stitch because needle knitters are working the wrong side of their knitting and we are still on the right side.

Things to remember:
  • If you are a beginner at converting patterns, it's best to start with patterns that contain easy conversions such as garter stitch patterns, knit/purls, fair isle (usually mostly knits), colorwork patterns, gansey patterns then patterns with eyelets. Try a lace pattern after you are comfortable with beginner patterns.
  • Knitting in the round:  No conversion needed since needle knitters will also be working on the right side throughout the pattern.
  • when working on the wrong side of a needle knitting pattern change your sts to the opposite stitch.
  • You must meet the gauge of the needle knitting pattern to know how many stitches and rows you will need. The math is very important.
  • Converting patterns becomes more complex when working lace as there are certain stitches we can not do without moving sts out of the way.

I hope my fellow loomers find this helpful.  There is much more in-depth information on this topic but I have always found the rules above to be very useful in understanding how needle knitting differs from Loom Knitting.  It's great in a pinch if you find that knitting pattern you just HAVE TO knit!

HAPPY LOOMING!  THANK YOU FOR READING!

copyright, 2014, thismomentisgood.blogspot.com, Nicole F. Cox, all rights reserved.
This cute sleeve could also be used as a credit card wallet!
 
I'm hoping to get a new iphone this year...mine is a few years old and hasn't handled all the new updates too well.  Of course, I'll want something to protect the new, shiny surface from scratches so I decided to work on an iphone sleeve pattern now, before I got the phone.  I used the diamond Brocade stitch so it wouldn't be too plain and added a simple crochet stitch around the edge.  It's a perfect fit for the iphone and I will probably use it as a credit card sleeve also on days when I don't want to carry around my heavy wallet.
Colors can easily be changed, just use a 4 ply yarn.  I hope you enjoy the pattern!
#freeloomknittingpatterns #loomknitiphonesleeve #loomknitiphonecase #loomknitwallet #loomknittingpatterns #loomknitcrafts #loomknitgiftpatterns #loomknittingpatterns

SUPPLIES:
Loom Knitting Tool
Blue Knifty Knitter Loom
Crochet Hook
Lion Brand Yarn (4); Color:  Beige
Vanna's Choice (4);  Color:  Cranberry

PATTERN:
Note:  Always repeat from * to * until you get to remaining pegs on each row.  Some rows will not repeat.
  • Cast on 19 pegs with 2 strands of Beige Yarn.  Work from Left to Right.
  • Rows 1 & 3:  skip1, knit.
  • Row 2:  skip 1, purl all.
  • Row 4:  skip 1, k4, *p1, k7*, p1, k4
  • Row 5:  skip 1, k3, *p1, k1, p1, k5*, p1, k1, p1, k3.
  • Row 6:  skip 1, k2, *p1, k3*, p1, k2.
  • Row 7:  skip 1, k1, *p1, k5, p1, k1*.
  • Row 8:  skip 1, *p1, k7*, p1.
  • Row 9:  skip 1, k1, * p1, k5, p1, k1*.
  • Row 10:  skip 1, k2, *p1, k3,*p1, k2.
  • Row 11:  skip 1, k3, *p1, k1, p1, k5*, p1, k1, p1, k3.
  • Row 12:  skip 1, k4, YO, k2tog, p1, k5, YO, k2tog, k4.
  • Rows 13-19:  Repeat rows 5-11.
  • Rows 20-67:  Repeat rows 4-11.
  • Rows 68 & 70:  knit
  • Rows 69:  purl
  • Bind off loom after measuring...Sleeve should be 10" in length.
  • Weave in all ends.
  • Block sleeve.
ASSEMBLE:  Fold up bottom  3-3/4".  Mattress Stitch up sides of sleeve.  Fold over top piece leaving 1/2" at bottom.  Line up buttons with holes and sew buttons on.

OPTIONAL:  Sample shows a single crochet stitch along top sides of sleeve.

THANK YOU FOR READING!  HAPPY LOOMING!

2014, Copyright, thismomentisgood.blogspot.com, Nicole F. Cox, all rights reserved.  These are test patterns and are for personal use only.  Knit at your own risk.  Do Not print or copy these patterns.  Links to these patterns are fine but do not copy and paste them on other websites.


Updated. Our Etsy Store just celebrated its' 4th Anniversary. Thank you to all of our customers who have helped make it a success!


We've expanded!

Visit us at...


A Cold Weather Favorite...


     This is one of my favorite soups.  It tastes so close to the Olive Garden version that you'll think you're there! It's easy to make but tastes like you spent all day in the kitchen.  By substituting ground turkey for the red meat, my recipe is lower in fat then the traditional version.  Unfortunately this soup is almost always high in sodium so I try to find low sodium or no salt added canned ingredients.  They are now widely available. I also amp up the veggies and lower the amount of pasta to keep calories within reason. You can add a can of low sodium white beans to this soup, if you want it more chili like.  Don't forget the garlic bread, it's the perfect accent to this wonderful dish! #slowcookerpastaefagioli #slowcookerpastaefagiolirecipes #slowcookerrecipes #pastaefagioli

RECIPE INGREDIENTS

1 Pound Ground Turkey, browned and drained
1 Onion Diced
2 Medium Carrots diced
3 Celery Stalks
1 Cup fresh spinach, Diced
1/2 Cup Cabbage, diced
1 Can low sodium Dark Red Kidney Beans with liquid
24 ounces low sodium V8 Juice
2 cans no salt added petite diced tomatoes
2 cups low sodium or salt free beef broth
1 teaspoon Italian seasonings
Pinch of crushed red peppers
1/4 teaspoon seasoned salt
1/2 teaspoon black pepper
2 cloves garlic
1 tablespoon Worcestershire Sauce
1 1/2 Tablespoons Red Wine Vinegar
1 cup cooked ditali pasta

DIRECTIONS

Place all the above ingredients in the slow cooker.  Cook on low for 6-8 hours or on high for 4-6 hours. Turn slow cooker up to high and Add 1 cup of ditali pasta 20 minutes before serving.  Serve with hot, garlic bread!  Enjoy!

THANK YOU FOR READING!  HAPPY SLOW COOKING!

copyright, 2014, thismomentisgood.blogspot.com, Nicole F. Cox, all rights reserved.

I've spent the week getting my yarn stash and looming supplies organized!

#yarnorganization #craftroomorganization #yarnwinding #loomknittingorganization

Sorry I haven't been posting much lately but it was time for me to get some organization in my life again.  My yarn stash and looming supplies have gotten out of control.  I've been envious of some of the pictures I've seen on +loomaholics.  They've had some really creative organizational ideas!  I love the new yarn winder my daughter got me for Christmas.  It makes a beautiful yarn cake that feeds so smoothly from both ends.  Unlike other loomers, I actually hate the process of winding though.  If I never saw another pile of yarn barf, I would be a very happy knitter.  Every single ball of yarn I wind knots repeatedly.  I watch You Tube videos and others don't seem to have this problem.  Apparently I'm not cut out to be a proficient winder so I won't be giving advice on how to properly wind yarn.  I will tell you that my favorite thing about having a winder is that, as the cake gets smaller and starts to collapse, you can just rewind it and have another neat little cake again.  They do look so beautiful too, full of all kinds of possibilities!

Basically this week I decided to wind all my yarn into cakes, even the type of skeins that really don't need it.  This way I can insure that while I'm knitting I don't come across any surprises.  I'm bagging all of my cakes and just leaving out one cake of each color.  That way I can protect my yarn from dust and light.  My husband was nice enough to get involved in the project and went out to AC Moore and bought me a couple of pine shelves and bolted them together.  I now have floor to ceiling yarn and loom storage in my craft room.  He bought large cup holders and bent them.  They are perfect for hanging the looms on.  On the other side of the shelves we hung baskets for notions.


I also have been collecting empty toilet paper rolls.  They are perfect for winding small amounts of yarn on. They also fit nicely into a small drawer.  The other small rolls of silk & cotton, I bagged in Zip Locs and placed in a basket that fits perfectly up on a shelf in my craft room.  I designated another as a project basket for "works in progress". In the past, those were just strewn all over the couch.  I'm sure my husband appreciates this new organized me, lol!


One of my favorite projects I'm working on is getting stitch samples organized.  My stitch samples measure about 3 x 5.  I've attached cards to them with the stitch name, whether the stitch curls or not, type of yarn used and a reference number.  The reference number coordinates with a three ring binder which has sheets listing the stitch sequence (or how the stitch was done).  That project will probably take a year to complete.  Stitch samples make it so much easier when designing a pattern so I'm really excited about this project!

I don't bother to weave in my ends and often use cheaper yarns when doing the sample.  The ends are convenient for tying on the tags.


THANK YOU FOR READING!

copyright, 2014, thismomentisgood.blogspot.com, Nicole F. Cox, all rights reserved.

Powered by Blogger.