Printfriendly

     Over the last year I've been asked hundreds of times for videos explaining the different stitches and techniques used in my loom knitting patterns.  Well, I've finally started a YouTube Channel. Please be patient with me, I know nothing about video making! Also let me know what topics you'd like to see covered in the future.  I'll keep a list and make videos as I get time. 


     Here is the link to my YouTube Channel if you want to check it out:  This Moment is Good on YouTube!

I hope to have many more helpful videos up in the near future!  Happy Looming!
Tell someone special that you love them with this adorable Loom Knit Heart Pillow!
FREE PATTERN
#freeloomknittingpatterns #loomknitheart #loomknitheartpillow #loomknitpillow #loomknitvalentine #valentinesday #loomknitting #loomknit


Loom Knit Heart Pillow

Loom Knit Heart Pattern

Supplies:
  • Purple KK Loom or any loom with 5/8" peg spacing and enough pegs.
  • Knitting Tool
  • Yarn Needle
  • Measuring tape
  • Crochet Hook
  • Yarn:  Any 4 Weight yarn; 2 colors.
Pattern Note:  k =  u-knit
Pattern: Heart measures 9" x 9" at widest points.
MC=Main Color
CC=Coordinating Color
  • Chain cast on 4 pegs with 2 strands MC.
  • Row 1:  ewk
  • Row 2:  k
  • Row 3:  Repeat rows 1 and 2 until knitting measures 5 inches (6 inches, 2nd section CC). Keep track of your rows so that your knitting remains even throughout sections.
  • Cut working yarn; do not bind off.
  • Repeat above over next 4 pegs. (pegs 5-8)
  • Repeat again over next 4 pegs; (pegs 9-12). You will have 3 sections now.
  • Now start working over 12 pegs.
  • Row 1:  ewk
  • Row 2:  k
  • Repeat rows 1 and 2 until knitting measures 3 1/2 inches.
  • Now move peg 1 to peg 2.
  • Move peg 12 to peg 11.
  • Repeat rows 1 and 2.
  • Move peg 1 to peg 2.
  • Move peg 10 to peg 9.
  • Repeat rows 1 and 2.
  • Move peg 1 to peg 2.
  • Move peg 8 to peg 7.
  • Repeat rows 1 and 2.
  • Chain one bind off.
  • Repeat above for coordinating color.
Back of Heart...Done in 2 sections.
  • Chain cast on 6 pegs.
  • Row 1:  ewk
  • Row 2:  knit all, wrap next empty peg.
  • Row 3:  ewk all, wrap next empty peg.
  • Row 4:  k
  • Row 5:  ewk all, wrap next empty peg.
  • Row 6:  knit all, wrap next empty peg.
  • Row 7:  ewk
  • Row 8:  knit all, wrap next empty peg.
  • Row 9:  ewk, wrap next empty peg.
  • Row 10:  k
  • Row 11:  ewk
  • Repeat rows 10 and 11 until knitting measures 3 1/2".
  • For 2nd section repeat rows 1-11; then repeat rows 10 and 11 until knitting measures 8 1/4".
  • Seam 2 sections together to match front of heart.
Assembly...
  • Face wrong sides together; whip stitch edges together leaving 3 inches open.
  • Turn right side out.
  • Stuff inside of heart; stitch closed.
  • Sew on a hanger if desired; use ribbon or yarn.

HAPPY LOOM KNITTING!

2015, thismomentisgood, Nicole F. Cox, all rights reserved.  Link to this blog only; do not copy and paste content.


FREE LOOM KNITTING PATTERN...


Six weeks ago, on Thanksgiving, I accidentally dropped a very heavy Christmas tree on my foot and ended up in the emergency room. My foot was so swollen that I couldn't stand anything near my foot.  The doctors wanted me to keep ice on it but even that hurt.  Since I was stuck on the couch anyway, I came up with the idea for a loom knit ice bag.  I wanted it to sit flat and be soft and I added cables because it had to be cute, of course! It works great, I just stick a sandwich bag of ice inside and put it on the injury.  I think it would be a really good gift bag or small evening purse. I hope you enjoy this pattern!
#loomknitgiftbag #loomkniticebag #freeloomknittingpatterns #loomknittingpatterns #loomknitting #knittingpattern #loomknitcablebag #loomknittingcables


LOOM KNIT ICE/GIFT BAG PATTERN

Final Measurement: 6 inches across base, 4 inch high when sitting flat; total height is 7 inches.

Supplies:
  • 66 peg small/medium gauge loom (CinDWood Loom used in sample)
  • Knitting tool
  • Crochet hook
  • Measuring tape
  • Yarn (MC):  1 skein, Encore Chunky Colorspun, 75% Acrylic, 25% Wool, (5); Color: Drifting
Pattern:
Key:  LTW = Left Twist; RTW = Right Twist; p = Purl; k = Knit; MC = Main Color
  • Chain cast on 66 pegs with 1 strand MC; join to work in the round.
  • Row 1:  *p1, k3, repeat from *.
  • Row 2:  *k1, p1, repeat from *.
  • Row 3:  k2, *p1, k3, repeat from *.
  • Row 4:  *k1, p1, repeat from *.
  • Row 5:  *p1, k3, repeat from *.
  • Row 6:  *k1, p1, repeat from *.
  • Row 7:  k2, *p1, k3, repeat from *.
  • Row 8:  *k1, p1, repeat from *.
  • Row 9:  *p1, k3, repeat from *.
  • Row 10:  *k1, p1, repeat from *.
  • Row 11:  k2, *p1, k3, repeat from *.
  • Cuff stops here, start body of bag...
  • Row 12:  *p3, k2, repeat from *.
  • Row 13:  Repeat row 12.
  • Row 14:  *p3, RTW, p3, LTW, repeat from * to last peg, p1.
  • Row 15:  Repeat row 12.
  • Repeat rows 12-15 until knitting measures 4 inches.
  • Next row: purl
  • Now repeat rows 12-15 until knitting measures 7 inches.
  • Bind off using gather method; pull closed; secure.
  • Weave in ends.
  • Weave 1 strand of yarn or ribbon through knitting at base of cuff; gather top and tie a bow.
  • Enjoy your new bag!
THANK YOU FOR READING, HAPPY LOOMING!
Top of Bag
Bottom of Bag

2015, thismomentisgood, Nicole F. Cox, all rights reserved. Do not copy and paste content, link to this post instead please.

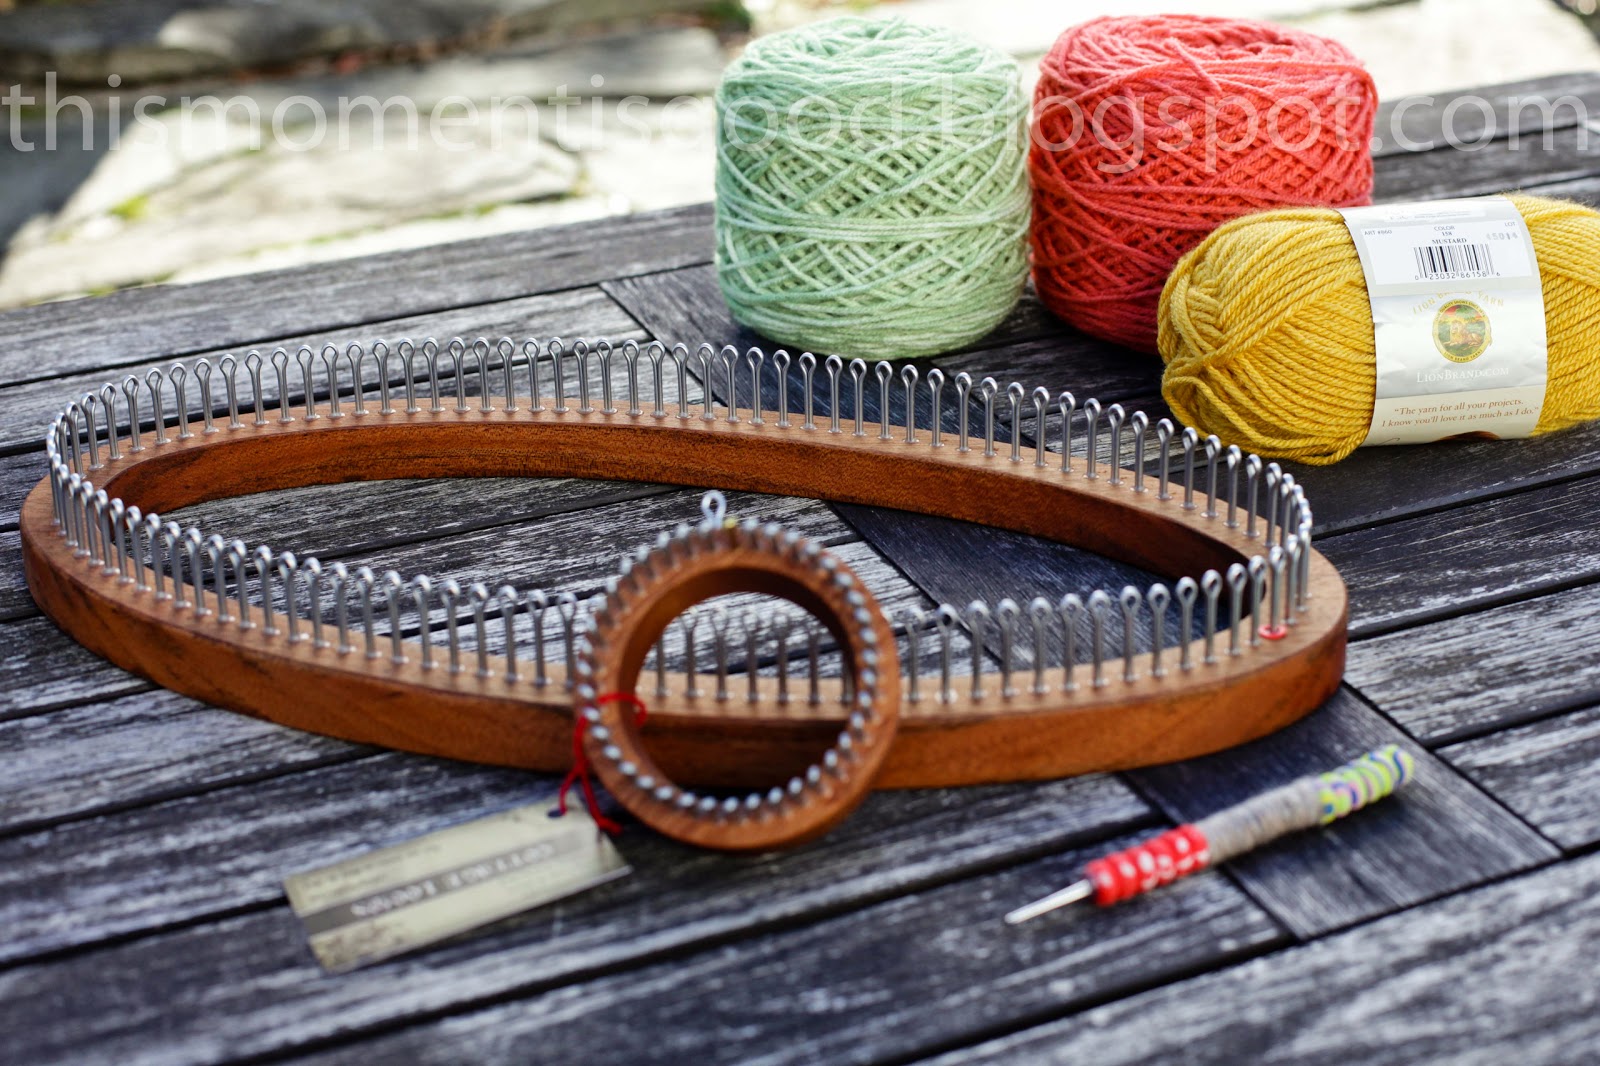
Cottage Looms and knitting tool with padding added

Last month, I received two new looms from Cottage Looms. They are probably the most beautiful looms I've ever seen!  When I opened the box, I was delighted. They reminded me of something you would find in a beautiful antique shop. The bases are hand finished wood and the pegs are metal. Each one came with a knitting tool and instructions. I couldn't wait to use them. I have the 108 peg small gauge cowl loom and the sock loom.  Both looms are 1/4" peg spacing.  The knitting tool is ultra sharp so you have to be careful not to touch the point.  This tool is needed to lift the yarn off the metal pegs.  I found the tool difficult to use at first because it was thin but quickly fixed that by hot gluing yarn around the handle and adding padding to it. Now the tool is perfect for me.

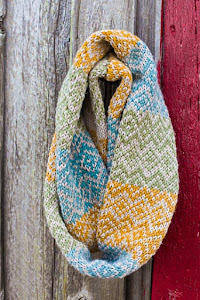
I have made a beautiful Fair Isle Cowl on the 108 peg loom.  The stitches are even and I was able to use one strand of yarn on the project. Like all new looms, it took some time to get comfortable using the metal pegs but after several rows, I was moving along at a nice pace. I appreciated the round/oval shape of these looms.  I find that the rectangular corners of most small gauge looms slow my knitting down considerably.
Cottage Looms are made from wood so they are a little heavier than other types of looms. I did not find this to be a problem though as I usually rest my round looms in my lap as I knit.

Before ordering your looms decide whether you would like a brass starter peg and a holding peg.  They will put them on if you would like. One of my looms has both the starter peg and the holding peg (small loom). The other has the regular metal pegs only (large cowl loom).  I recommend these looms for anyone wanting to do small and fine gauge loom knitting, they can really take your knitting to the next level!

close up of 2 Cottage Looms and pegs
#CottageLooms #cottageloomreview #smallgaugelooms #loomknitting #freeloomknittingpatterns

THANKS FOR READING, HAPPY LOOM KNITTING!

2015, thismomentisgood, Nicole F. Cox, all rights reserved.
An easy tutorial on how to take a loom knit square and turn it into a cute bunny rabbit! Perfect for the upcoming Spring and Easter Season.
#loomknitbunny #loomknitamigurumi #freeloomknittingpatterns #loomknittingpatterns #loomknitting #loomkniteasterpatterns #easter #easterbunny #loomknitrabbit #patterns #knittingpatterns


Loom Knit Bunny How-To

First make your square:  The above bunny was made with a 10" x 10" square.  You can make your square any size. Any loom, any yarn.  The below directions are for the exact bunny above.  I used (5) weight yarn and the purple KK Loom. If you would like to use it as a childs toy, you may want to do a tighter stich then garter for washability and to better hold stuffing inside- the flat knit stich would work well.

  • Chain cast on 26 pegs.
  • Row 1:  k
  • Row 2:  purl
  • Repeat rows 1 and 2 until knitting measures 10".
  • Bind off.
  • Make small pom pom in coordinating color.
  • Follow picture tutorial below.

I attached a small pom pom to back end of bunny and used a little white yarn to stitch on a fuzzy nose. I also used 1 stitch (black) for each eye.  Shape the knitting by gently pulling on it.

HAPPY LOOM KNITTING! THANKS FOR READING!

Copyright 2015, thismomentisgood, Nicole F. Cox, all rights reserved.  Please link to this blog only.


Powered by Blogger.